|
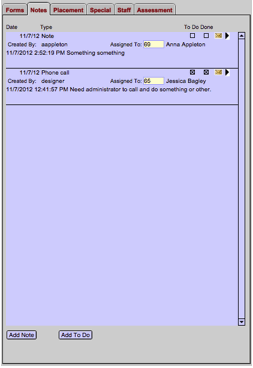
Click on the Notes tab to access this area. Here you can type in any additional information pertaining to the student. 1) Add a Note or “To Do:” Selecting the Add
Note button adds a standard note, assigned to the logged-in user by
default. It can be re-assigned to any user by clicking in the small yellow
“Assigned To” box and selecting another name. Selecting the Add To Do button adds a note just
as the Add Note button does, but with the To Do checkbox already
checked. 2) Note Types: There are four note
classifications available: note, meeting, email or phone call. Users can use any (or none) of these
preset types, or create customized ones to meet individual needs. 3) To Do Feature: Clicking the To
Do checkbox and selecting a staff member from the Assigned
To drop down box assigns the "to do item" to that staff
member. This causes the note to appear on the To
Do tab of their Staff screen and will also
highlight the student’s name in red on the appropriate Roles tab,
indicating that there is an open “to do” item for that student. 4) Viewing Note Details: The first few
lines of the note details are previewed directly on the Notes tab. Clicking the black triangle on
the right side of each note displays the Note Detail Screen
with the entire note contents. |