From the Student Screen, click the Reports button. The E-Com Reports Screen will be shown. You may get a message reminding you to be sure you have found all the student records for the report in question.
The ‘Report Title’ and ‘Note for Report Header’ fields allow you to define any desired title/header for any report except the three with peach-colored buttons. These three have automatically generated titles.
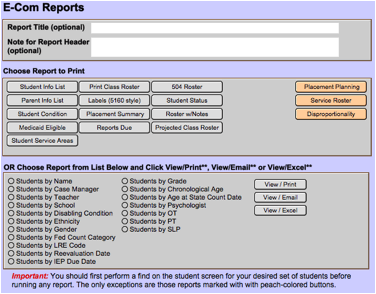
The instructions for printing reports are displayed directly on the screen.
1.
Go to
the Student screen and click the Find button to locate the student records you
want to print.
2.
Once done, click
on the Reports button on the Student screen to return to this screen.
4.
Click
the desired Report button. If
you select one of the “Students by...” reports, or the Service Roster, you have
three different options – you may print the report, you may email the
report, or you may export the report in Excel format.
5.
Once the
report is displayed, you will see the Status Area (shown below). From
there, click the Continue button to bring up the Print dialog box. If you decide
not to print it, click the ‘Continue’ button and then Cancel the print job.

Related Topics